
Appearance
Analysis Mode
This mode scans the allowed folders and individually tracked files and creates an index of the selected file formats using the active models configured in the Welcome Wizard or Settings. To use the search functionality, you must complete at least one analysis with an analyzer.
INFO
You can also activate this view by using View -> Analysis Mode or pressing F2.
Analysis Mode will have the following layout:
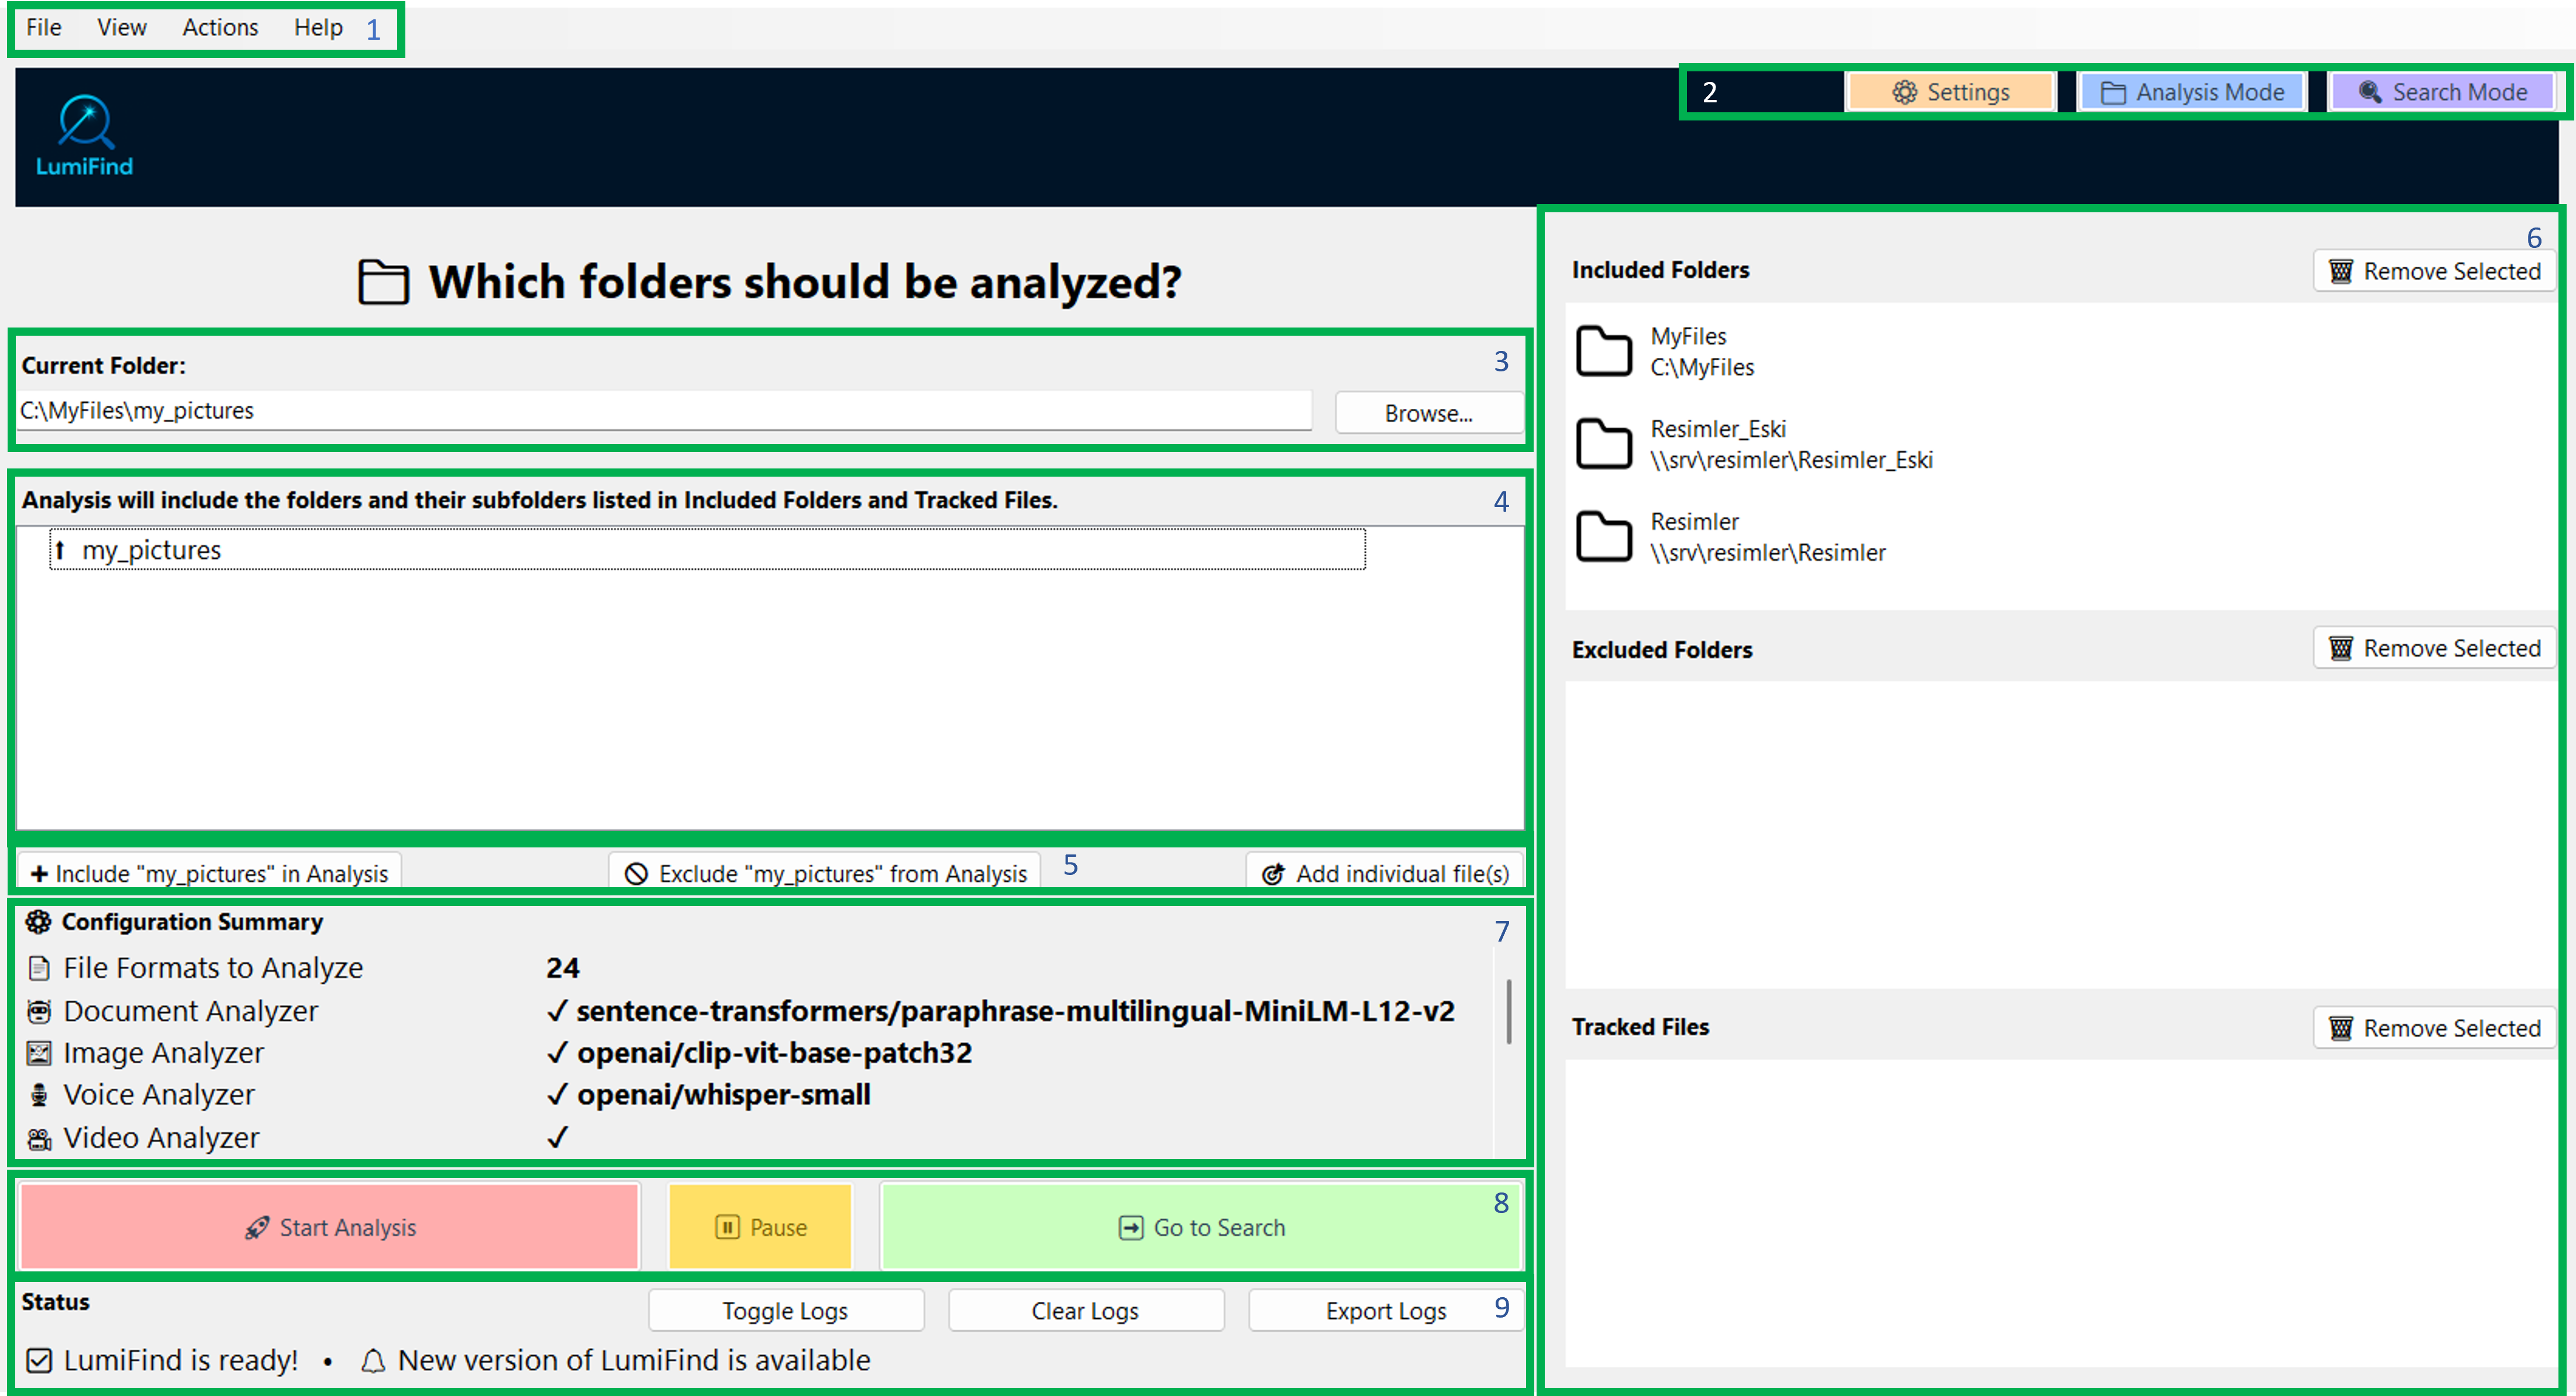
Refer to the image above and the numbered areas. Each section is explained below.
File, View, and Help menus.
- File: Create Backup opens a dialog to back the analysis data up as described here. Export Search Results saves the current search results as CSV, TXT, or HTML. Settings opens the settings window and Exit quits the program.
- View: Displays options to switch between Analysis and Search mode.
- Actions: Quick shortcuts for Search Mode. Includes Focus Search Input (
Ctrl/Cmd + E), Select Similar File... (Ctrl/Cmd + O), Find Duplicates... (Ctrl/Cmd + D), Pause/Resume File Watcher (Ctrl/Cmd + P, only when file watching is enabled), search type shortcuts (Ctrl/Cmd + 1..5), and Stop Search (Ctrl/Cmd + .). - Help: This menu lets you open the LumiFind website, access the online documentation (Shortcut:
F1), check for software updates, and open the License Manager, the About window, and the Welcome Wizard (Help -> Welcome Wizard...).
Settings and mode selection buttons. The Settings button becomes available once LumiFind is ready. You can also use
Ctrl + ,on Windows/Linux andCmd + ,on macOS to open it.The currently viewed folder, along with a "Browse" button for quick navigation. It is also possible to paste a path and press
Enter.Subfolders within the currently viewed directory.
Buttons to add a folder in a list in item 6, or to remove it from that list.
Included Folders: The list of folders that LumiFind will analyze. Excluded Folders: Folders that LumiFind will not crawl into. Tracked Files: Individual files to analyze and track for changes.
Right-clicking an entry in any of these lists opens a small menu where you can reveal the folder or file in your file manager. You can also remove an entry from the list there; removal is available only while analysis is not running.
A summary of the current settings which are going to be used when analysis starts.
Buttons to "Start" or "Stop" the analysis, and a button to switch to "Search" mode.
The Status panel, which shows information about ongoing actions. You can toggle log visibility with "Toggle Logs", clear them with "Clear Logs", or export to a file by pressing "Export Logs" button. You can also automatically export logs for each session if you enable Settings -> Analysis Settings -> Auto Save Logs to File.
Below the log panel, a single-line status bar summarizes what LumiFind is currently doing. It stays visible even when the log panel is collapsed, and it does not report a finished analysis while indexing is still running.
Depending on the models you have chosen in the Welcome Wizard or in the Settings window, and their enabled statuses, LumiFind will load them. This may take some time, but it happens only once at each startup. The "Start Analysis" button will be enabled when everything is ready, and a "LumiFind is ready!" message will appear in the Logs (8).
If this is your first time starting, you will need to select some folders via (3) or (4) and include them into (6) to start analysis. Alternatively, use "Add individual file(s)" button to select one or more files to analyze and track the changes. On Windows and Linux, you can use Ctrl + Left-click to select multiple files at once. On macOS, use Cmd + Left-click.
If you want to exclude a folder, browse via (3) or (4) and press "Exclude '<Folder Name Here>' from Analysis" button.
During analysis, Tracked Files will have precedence, then the Excluded Folders and finally the Included Folders. This means, if you have an individually tracked file and it is inside an excluded folder, this file will be analyzed. Similarly, if you included a folder, but excluded its one of sub-folders, those sub-folders will not be crawled hence the files inside will not be analyzed.
TIP
LumiFind can only access folders and files that you allow it to see.
You can change the current folder by selecting one in the tree view below (6) or by pressing the "Browse..." button. Once you are happy with a folder, press "Include '<Folder Name Here>' in Analysis" (5). To remove a folder, select it from a list and press "Remove Selected" above the list (5).
You can also include remote folders. On Windows, they start with \\. In that case, the include button will indicate that it is a remote folder. On macOS and Linux, remote folders are only possible if they are mounted and accessible via Finder or a file browser (e.g., Nautilus, Dolphin).
Before a full analysis starts, LumiFind checks whether each selected folder is reachable. If one or more folders cannot be opened (for example, because a network server is offline), one message lists them. If at least one selected folder is available, you can continue with the available folders or cancel. Unavailable folders are skipped for that run, and their existing search data is kept. LumiFind reports skipped folders when the analysis finishes. If none of the selected folders are available, the analysis will not start. Reconnect the server or drive and try again.
Similarly, if you want to include Cloud storage folders such as Dropbox, Google Drive, or OneDrive, simply browse to them and include them in the analysis.
Once you have included all the folders or files you need, press the "Start Analysis" button and grab some coffee (or water, or anything you like).
LumiFind now uses checkpoint system. Progress is saved periodically during analysis. If you stop the process using "Stop Analysis" or an unexpected interruption occurs, analysis can resume from the last checkpoint instead of starting over.
If you would like to temporarily pause the analysis to resume later, you can press "Pause" button. Once you decide to continue analysis, you can use the "Resume" button.
If you completed at least one analysis, then, on future launches, LumiFind will automatically switch to Search Mode to save an extra click.
INFO
Hint: To get familiar with the tool, it is recommended to start with a small set of folders and file types. This makes it easier to switch between models until you find the one that works best for you.