
Appearance
Welcome Screen
Introduction
Welcome Screen or Welcome Wizard will guide you through the optimal settings if the LumiFind is running on this device for the first time.
You can re-run the Welcome Wizard at any time from Help -> Welcome Wizard... to review or change your model, file type, folder, and fine-tune selections. When re-run, your current settings are pre-filled and you can adjust them; after finishing, restart LumiFind for the changes to take effect.
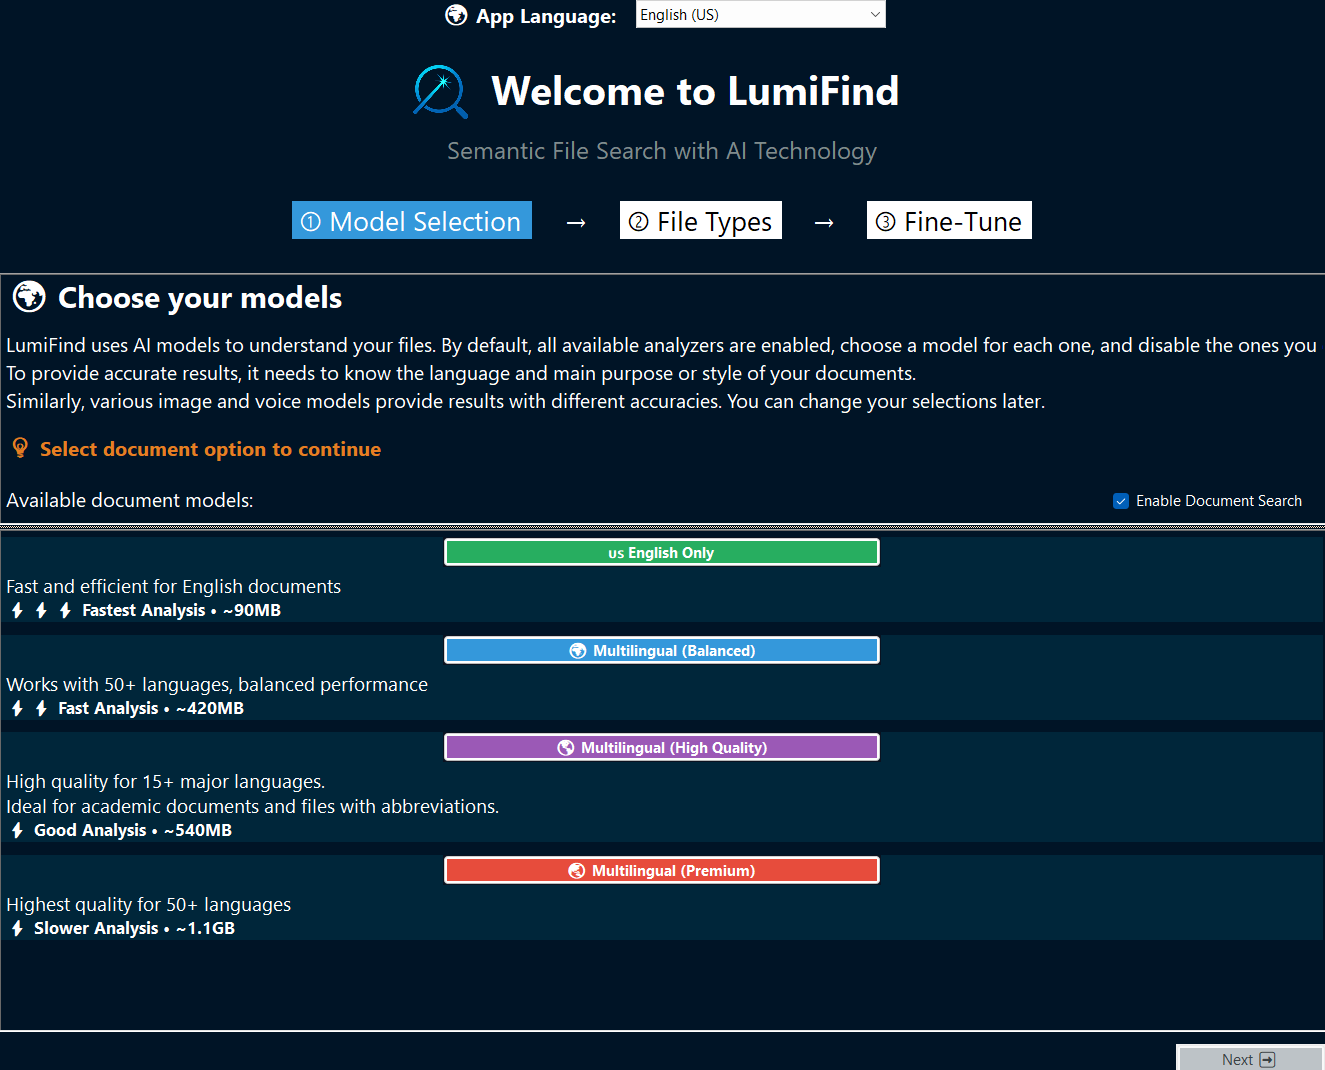 Document Edition
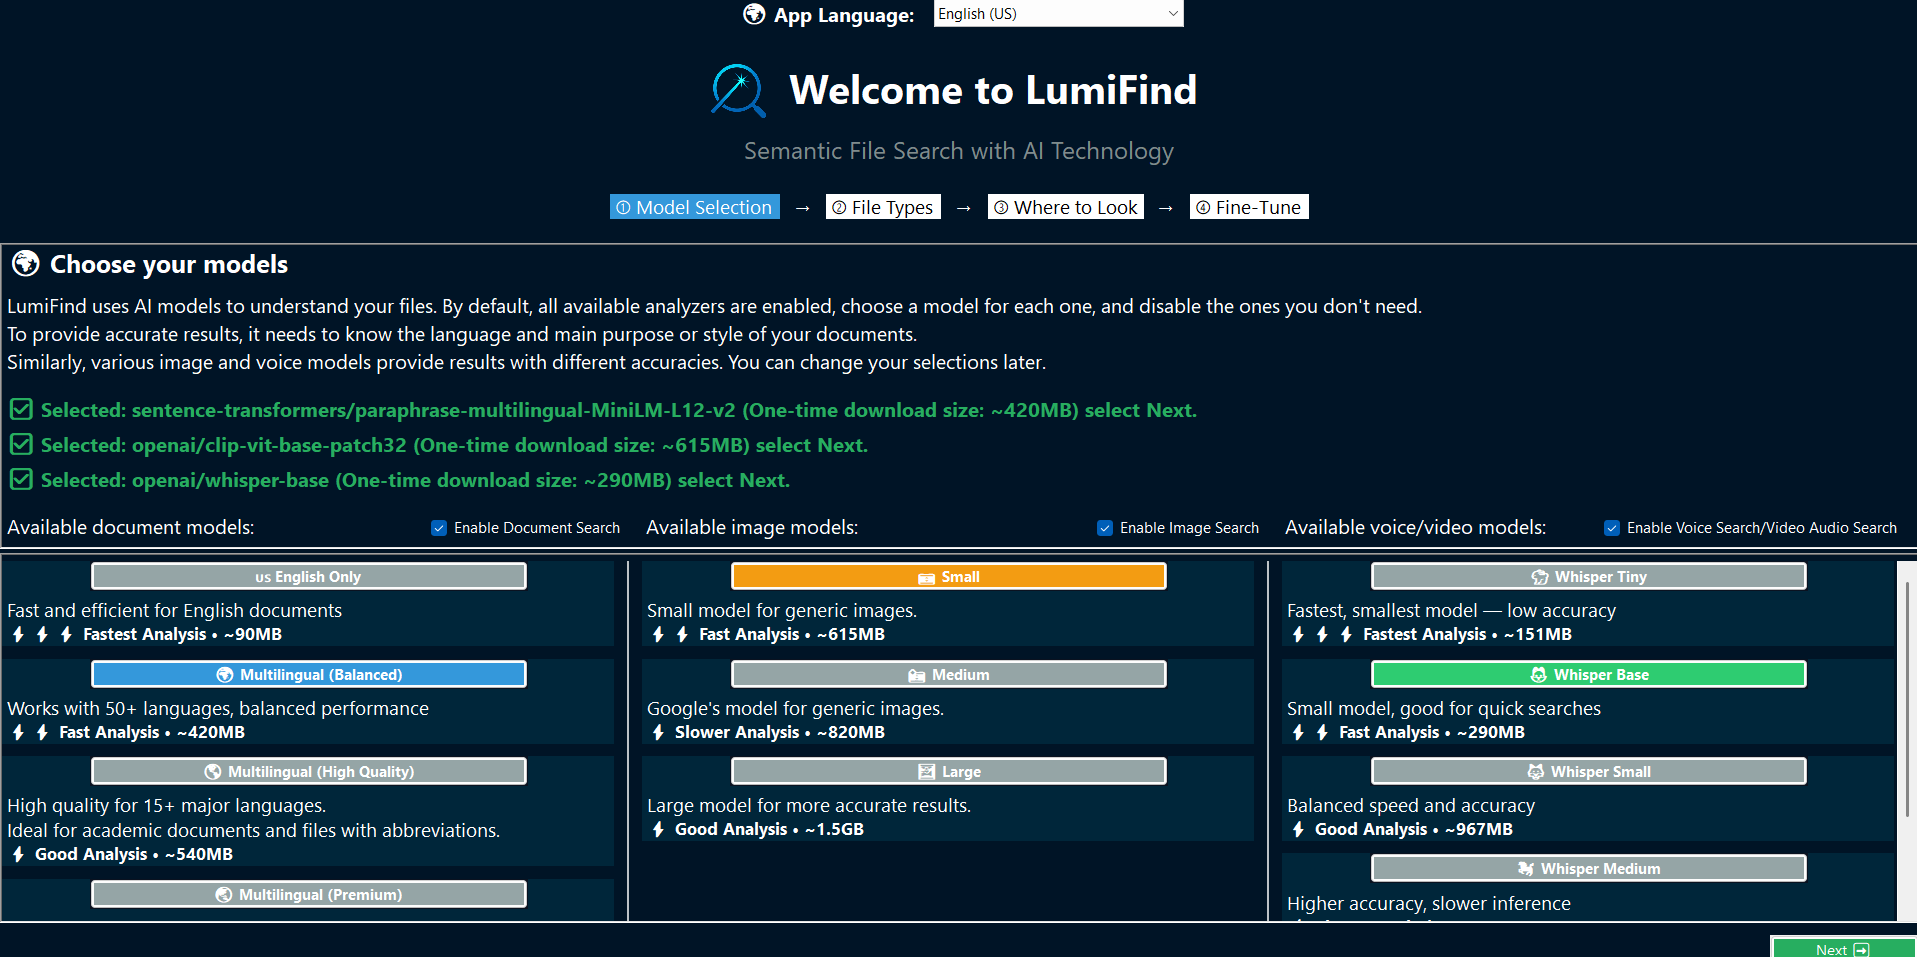 Pro Edition
The language you pick here will be the default language for the LumiFind for the upcoming launches. However, you can change it later via Settings.
In four steps, you can start using LumiFind.
Step 1: Choosing Models
Depending on your device's specifications (CPU, RAM, available disk space) and the types of files you work with, you can choose any of the available models.
The wizard will enable the "Next" button once all required models have been selected.
For example, if you only work with English documents, you can start with the smallest Document Search model. If you frequently search through documents containing many abbreviations or academic language, you might want to choose the Multilingual (High Quality) model instead.
INFO
To learn more on default models available in LumiFind, see: Default models included with LumiFind
You can change your selected models later in Settings, but keep in mind that files must be reanalyzed whenever a model changes. For instance, if you switch to a different Image Model, all previous image analyses must be deleted and recreated.
INFO
Tip: Start with a small set of files to find the model that works best for you. Each model has its own strengths and limitations.
If you want to use a custom model, you can add it manually through the settings. This will be covered in the Using custom models section in Advanced Use pages.
Models only need to be downloaded once. After that, they will be loaded automatically each time LumiFind starts.
INFO
If you are not interested in a particular type of analysis, for example Image Search, you still need to select a model for it, but you can disable it by unchecking "Enable Image Search". When disabled, the model will not be downloaded or loaded, which helps reduce resource usage. This is especially useful for devices with limited performance.
Step 2: Choosing File Types
LumiFind supports many file types and can extract text or other information from them. However, enabling more formats will increase the analysis time.
It is recommended to begin with the minimum set of file types until you become familiar with the tool and be confident with the model of your selection. You can always add or remove file types later in Settings.
Depending on your LumiFind Edition, some file types may be preselected automatically. You can read the descriptions and the corresponding file extensions below each option. If you want to include a file type, enable it using the "Enable" switch in the top right. If you are not interested in a particular type, or if it is not relevant to your workflow, you can disable it at any time.
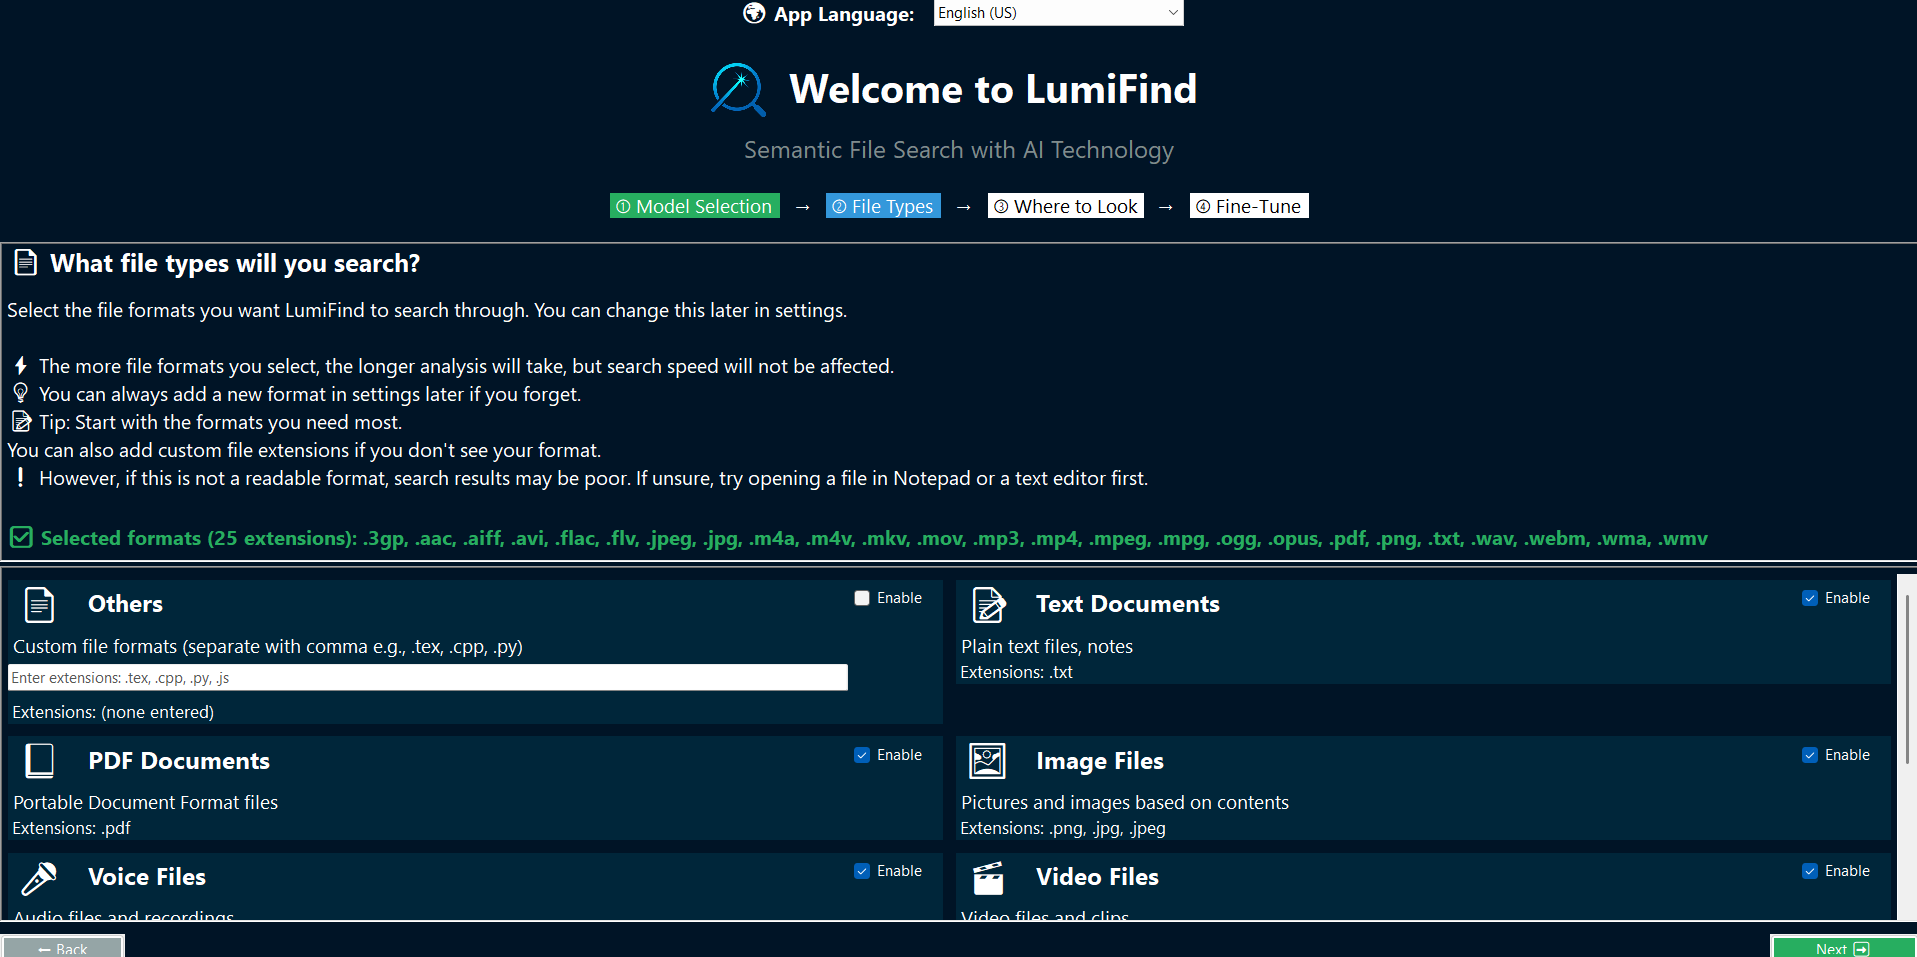
The "Others" section is a free-form field where you can enter additional file extensions that LumiFind does not list by default but can still read. For example, if you want to search through your program's source code, you can type extensions separated by commas such as .cpp, .c, .h, .hpp. Select "Enable" to include these formats. You can also add readable formats like Markdown (.md, .markdown) in the same way.
WARNING
Warning: If you add a format that is not readable as plain text, LumiFind will still attempt to extract content from it. This may take longer and produce poor results. To avoid issues, simply open the file type in a text editor first to verify that it is readable.
If you enable "Compressed Files", LumiFind will extract the archive and look for documents inside it. Since image, audio, and video compression is already very high, compressed files are only considered during document analysis.
Step 3: Where Should LumiFind Look?
Before you start, LumiFind needs to know which folders and files it should analyze. You can change this later in Analysis Mode.
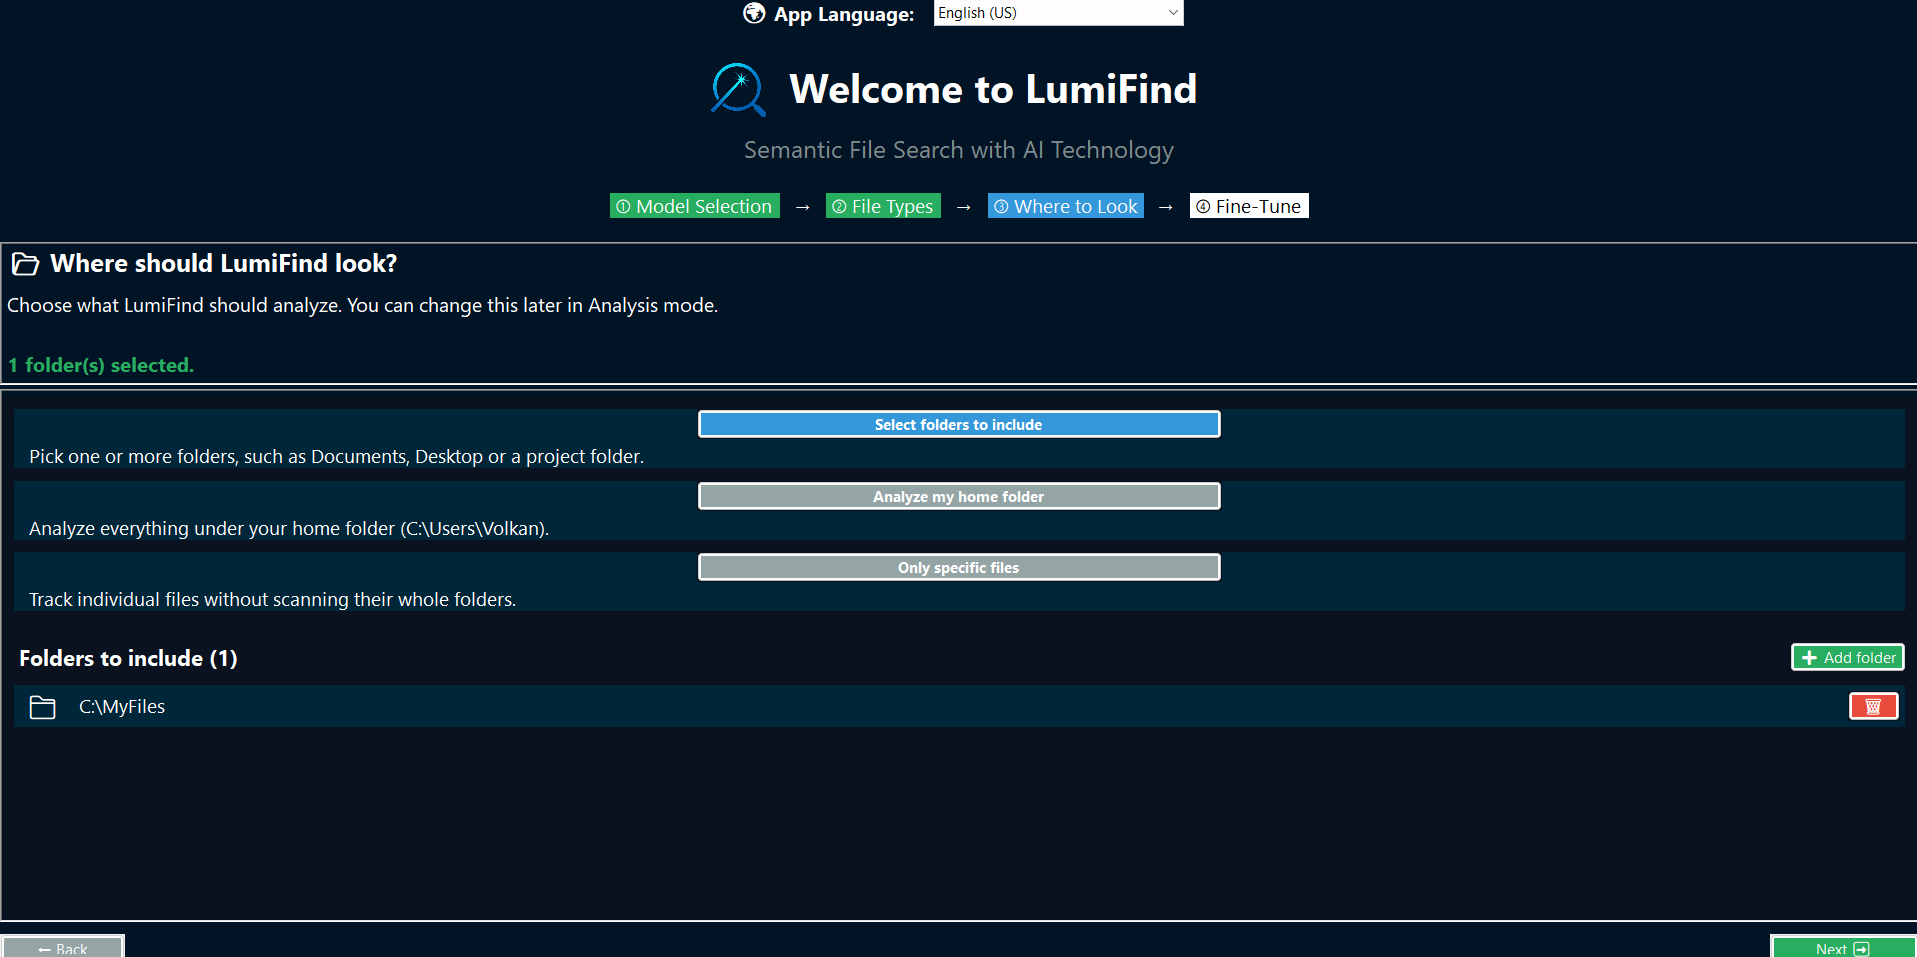
Three options are available:
- Select folders to include — Pick one or more folders, such as Documents, Desktop, or a project folder.
- Analyze my home folder — Analyze everything under your home folder. This is the quickest way to get started, but it can take longer and use more disk space.
- Only specific files — Track individual files without scanning their whole folders.
Use the "Add folder" or "Add files" buttons to build your selection. The status line shows how many folders or files are selected. If you do not choose anything, LumiFind will ask you to make a selection before you can continue.
INFO
Tip: Start with a small set of folders to find the model that works best for you. You can always add more folders later.
Step 4: Fine-Tune Settings
LumiFind started as a simple idea to help users find files faster. Over time, it evolved and introduced many powerful settings to enhance the overall user experience.
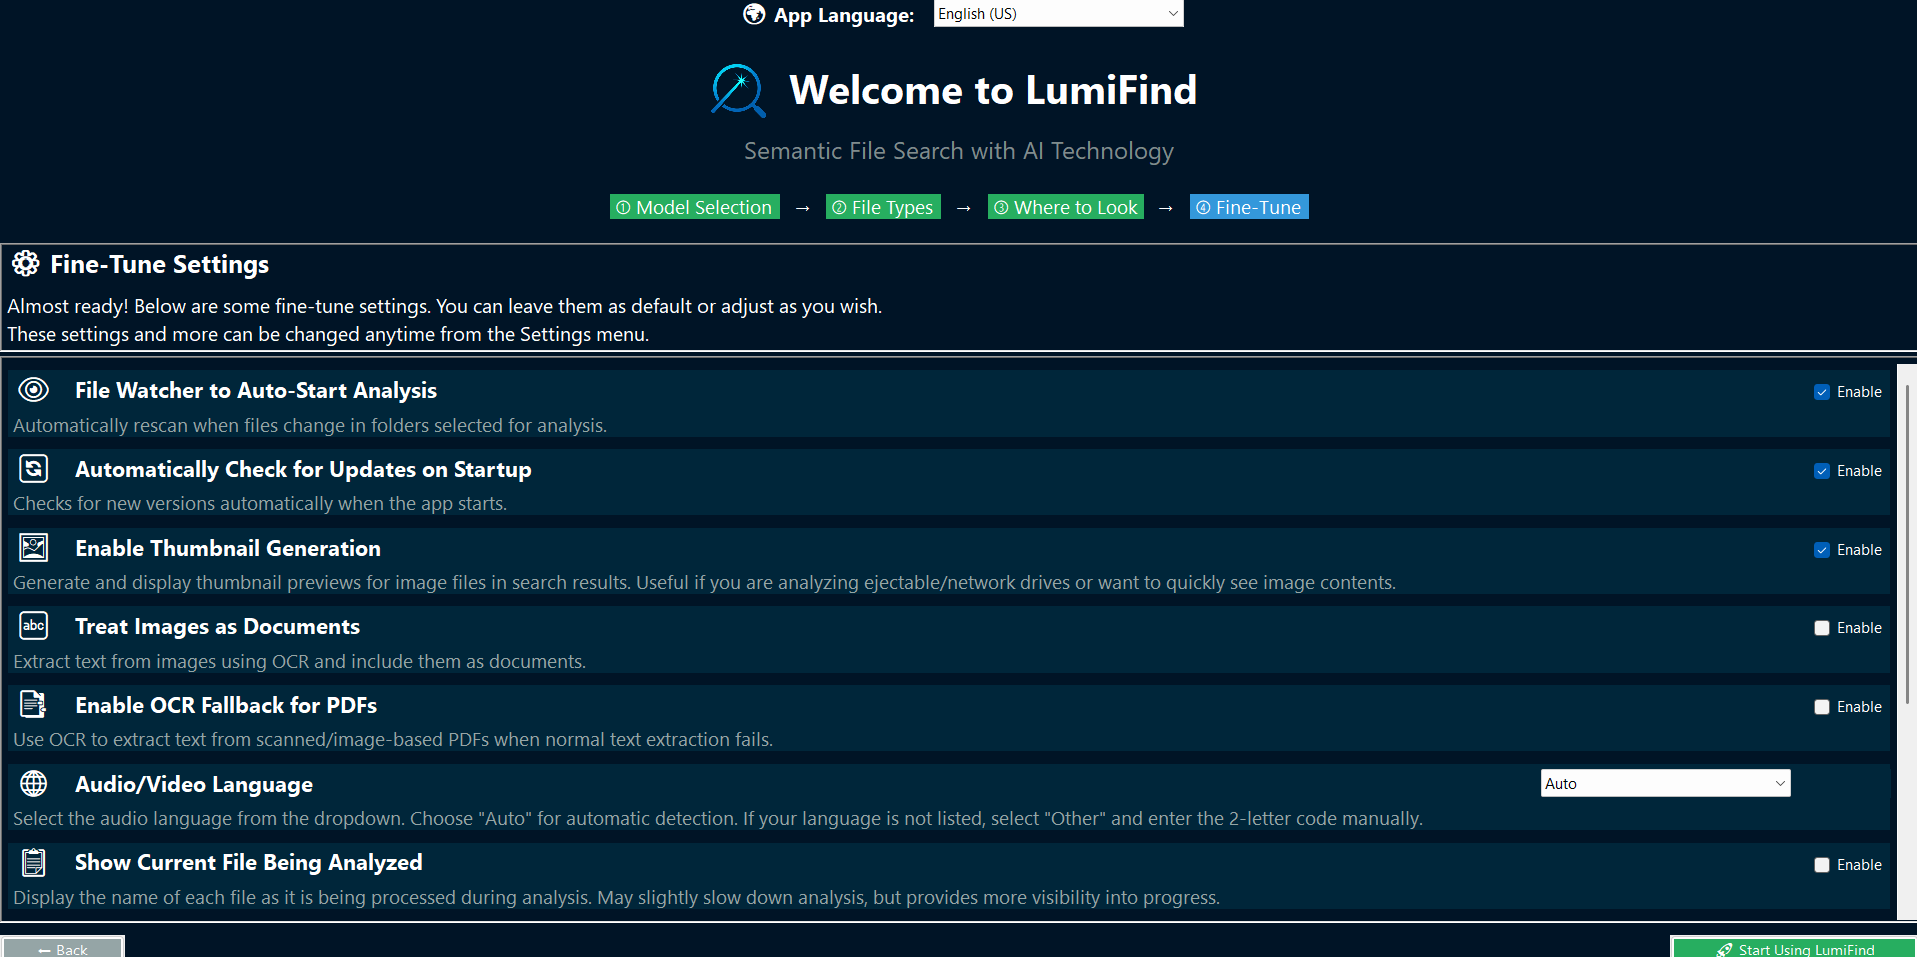
To keep the setup process simple while still offering flexibility, we included some of these advanced options as an optional fourth step.
In this step, you can review the settings and adjust them if needed. Each option includes a short description explaining what it does and how it can be used. More settings will be available after setup in Settings Window.
The options include:
- File Size Limits — Set the minimum and maximum file size for analysis. Files outside this range are skipped.
- Thumbnails — Generate and display thumbnail previews for image files in search results.
- Treat Images as Documents — Extract text from images using OCR and include them in search.
- PDF OCR Fallback — Use OCR to extract text from scanned or image-based PDFs when normal text extraction fails.
- Show Current File Being Analyzed — Display the name of each file as it is processed. May slow analysis slightly.
- Frame Sample Rate — Analyze one frame every N frames of a video. Lower values capture more detail but take longer.
- Image Batch Size — Number of images to process at once. Higher values use more memory but can be faster.
- Frame Detector — Choose the object detection model for analyzing video frames (speed vs. accuracy trade-off).
- Audio/Video Language — Select the spoken language of your audio and video files. Choose Auto (default) to let LumiFind detect it automatically, pick one of LumiFind's supported interface languages from the dropdown, or choose Other and enter the 2-letter code manually. This setting only appears if Voice or Video Search is available in your edition.
INFO
On Windows, when OCR options are enabled, LumiFind will remind you to install Tesseract and Ghostscript if they are not already present.
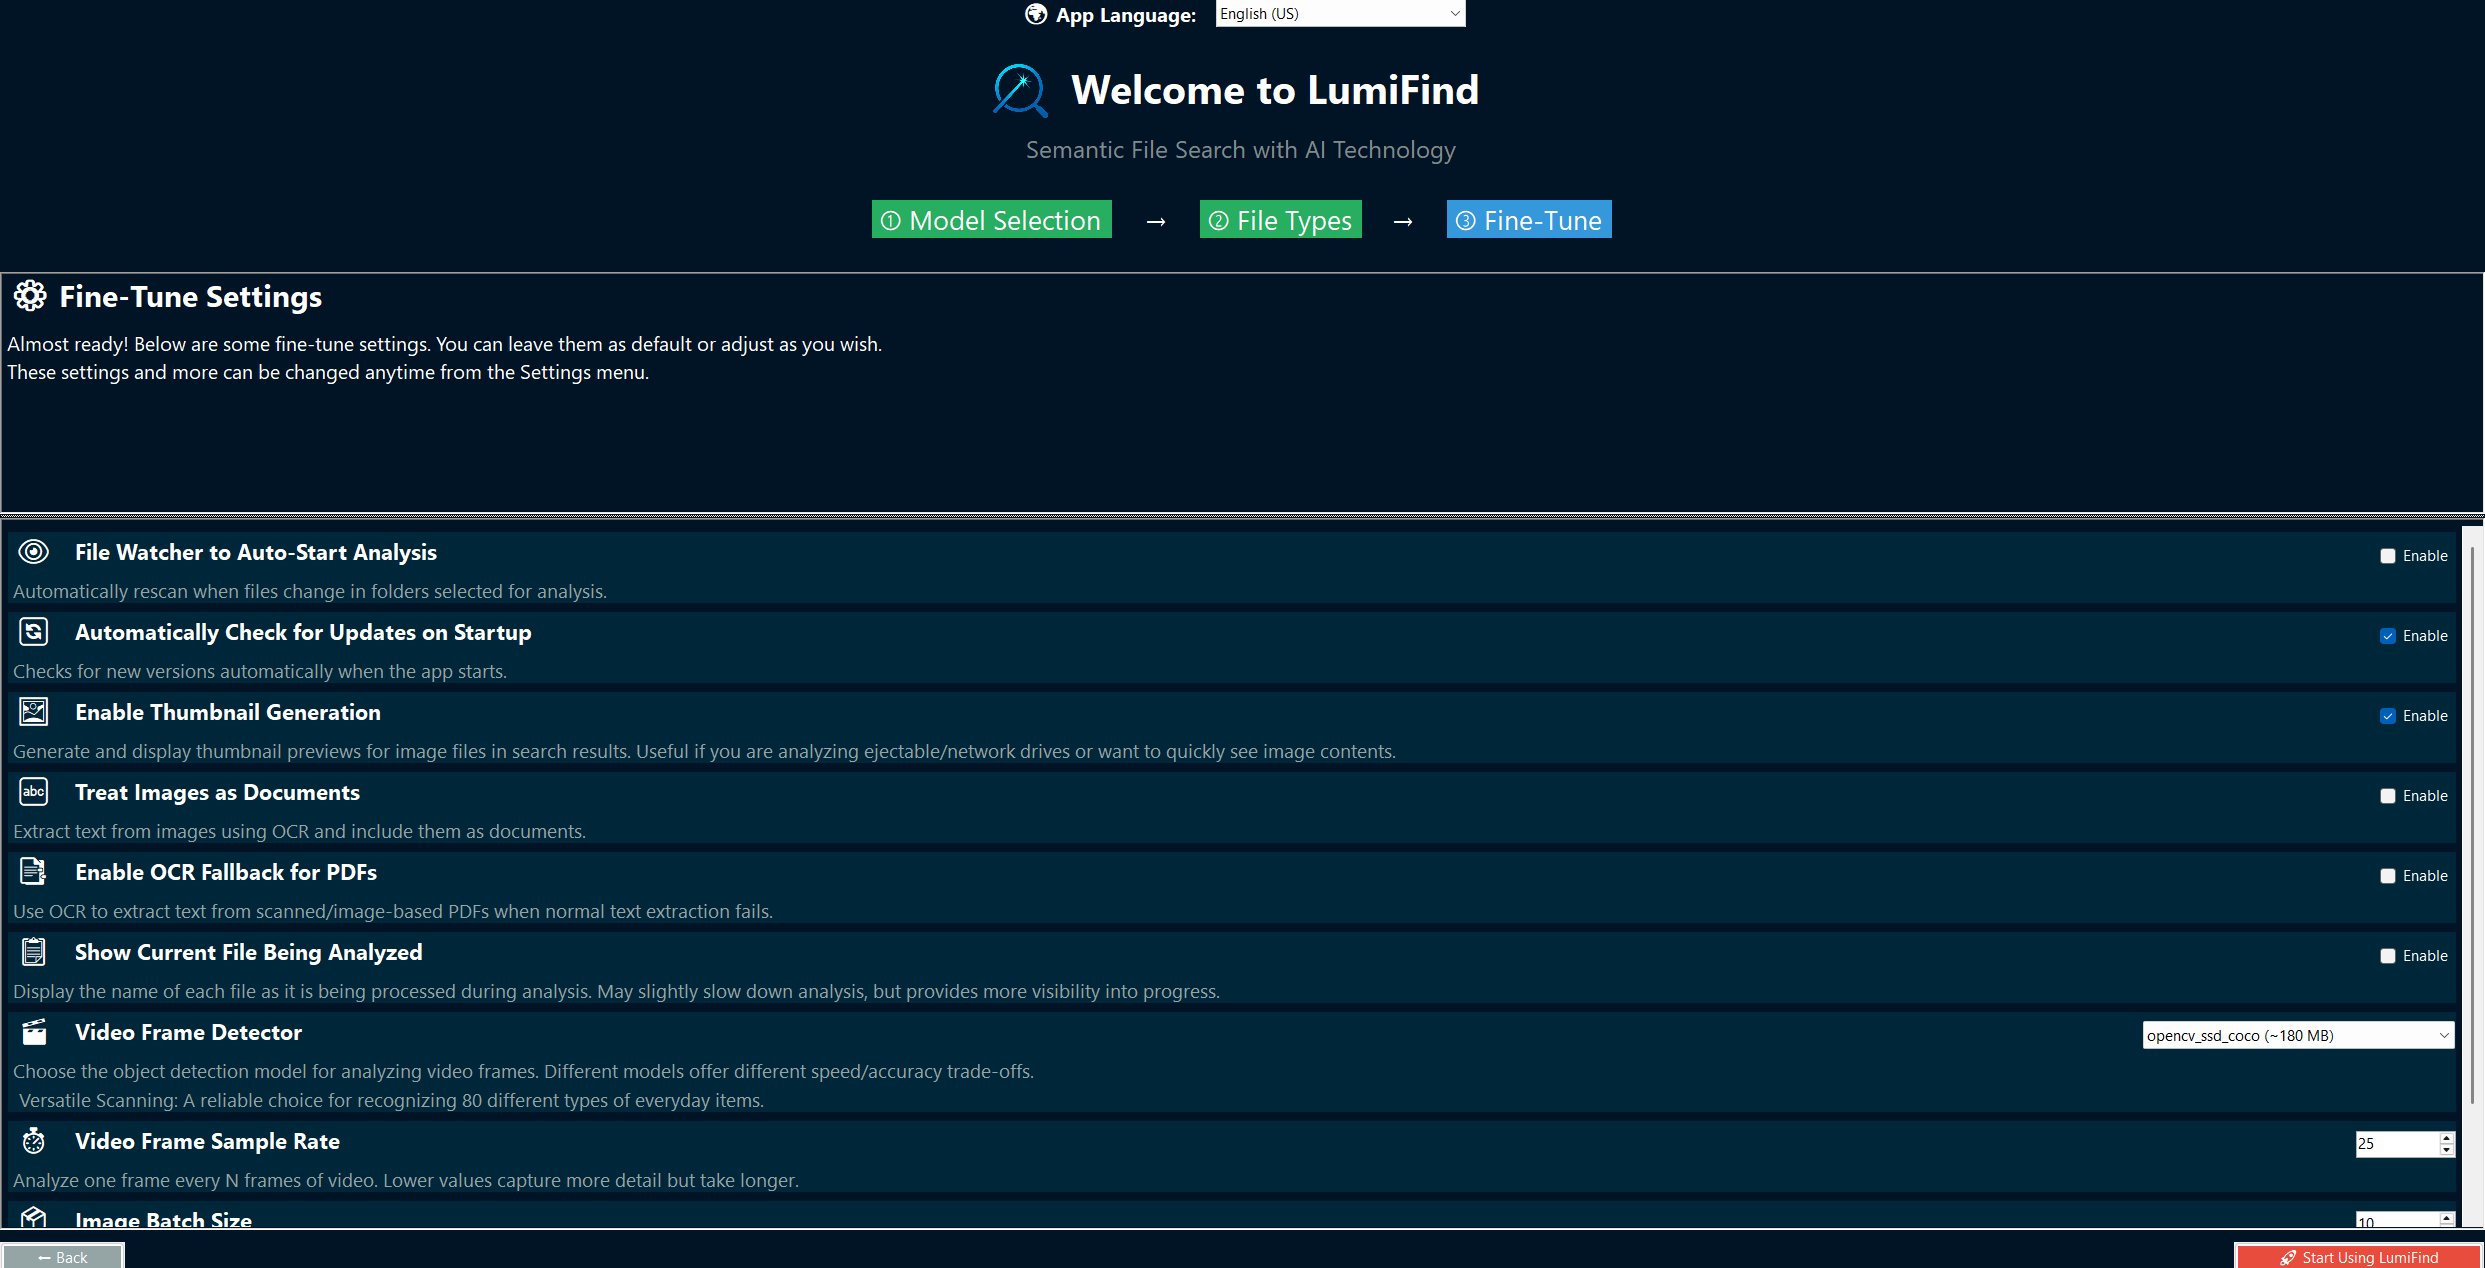
Once you are satisfied with your selections, click "Start Using LumiFind". If you want to return to previous steps, use the "Back" button in the lower left.